Extra stuff
Also, I did a quick cinematic for the portfolio.I edited it in Adobe Premier Pro. I added a few transition effects, put some free rain and piano audio, placed a few frames to different places and adjusted the colour values.
A few days after I decided to experiment with particles and already a long time ago was thinking of creating a rain particle system for my backyard project, however, I already sent my projects I still could enhance it. I easily found some tutorials and turns out it was not as hard to do as I thought. The video explains in 5 minus how to create a basic particle system of rain. After that in my recommendation list, I bumped into another tutorial explaining the fireflies particle process and it was easy as well. My expectations definitely do not match reality.
Presentation
I made some beauty shots with CineCamera. I did not change much in settings, although I tweaked the aperture to 22, focal length, ambient occlusion and shadow settings. In addition, I exported these screenshots to photoshop. I added vignette effect by drawing with black colour on top and turning on multiply mode, adjusted brightness and exposure, added colour lookup.


Decals
First of all, I considered the types of decals I need to produce. I knew that I have several objects that could be damaged somehow, so I decided to make some cracks and other damages. I will be using them for the brick fence and the building. I have noticed that you can easily reduce the sharpness and visibility of straight polygons on your mesh by adding edge damage decals on the 90-degree edges. For all other decals, I did not create any specific planes as they basically have to be just on planes and Unreal places your decals on planes.
Here are the planes that I used for my decals:

Then I exported it to Zbrush and created some imperfections and cracks on edges with a simple Clay and OrbFlatten brush. I baked it in substance and then switched to substance designer. I used substance designer for texture as long as I wanted to create a great variety of roughness and normal map. In addition, to make the arch more compelling I made a graffiti decal. Also, I forgot to mention puddle and wall damage decals that I made already a while ago.
Here are the results in Unreal:


Establishing lighting in the engine is one of the most crucial parts of making your scene looks a thousand times better.I have been watching many tutorials for lighting in Unreal engine and I came up to the realization that you have to combine different types of lighting along with different temperatures (cold and warm colours)for them.
Here you can see my final lighting setup:
Lighting&Composition

I drew circles and squares for rectangular and just basic point lights.
For the BP_sky_sphere I set the sun brightness at 3,7, sun height at -0.9, horizon falloff 4,7. Also, I made cloud opacity at 1.37 and its speed to 4.0. It created a nice night effect and I loved how visible the stars are.

One of the things I learned while setting the lighting, is to set sliders to the maximum to see what it does and then adjust it as you like. It gives you an idea of what those parameters do because sometimes the changes are hardly visible on the screen.
Overall, I like my lighting setup, I wanted to make a cosy night atmosphere and it works out. The warm light from the lantern and the contrast between warm and cold lighting makes an amazing effect.
Here is the lighting only mode on :

This is one of my favourite parts. I separated objects on different texture sheets and already prepared my high poky models. Now I'm ready to go further with textures. First thing first I did textures for all my wood props.
Props Texturing
 |  |  |
|---|---|---|
 |  |
Especially for planks, I used a lot of procedural maps with height parameters to make wood material more stand-out and realistic. I used a lot of dirt generators and mask editors along with noise maps. It created a nice illusion of shabby image for objects. That is exactly what I wanted. Also, what I learned was adding completely different colours within noise maps in order to liven up the picture and make it more attractive for the eyes. After all, we do not see objects in only one colour palette. The spectre of colours for a single object could be very huge. That is why you can see on all of my objects a hint of green and yellow colours.
During the process, I've been experimenting with various grunge maps and I found one that creates a nice wood texture if you add height parameter -Grunge Brushed. I find Grunge map 05 and Wood 01 useful as well, however, for this time I didn't use them as in my opinion they add a bit of stylizing effect to the texture.
Another day I decided to deal with my metal objects(barrels, hatch, door, trash bin)


For metal objects, I again wanted to recreate a shabby and used look, therefore I utilized a lot of metal edge wear, mask editors and different grunge maps that look like dirt or rust.
For the hatch, I draw sort of an outline with height, as I wanted to convey the look of a real street hatch.
I pasted by projection feature a basic picture of the hazardous sign to the door as I decided to recreate a transformer house for electricity regulations. I found this sign on the internet, however afterwards I found out that there are actually a bunch of different signs included in started assets of substance painter.
I've seen those doors a lot in my home country and that gave me an inspiration for creating it. I wanted it to look like a broken-down door and just put in my scene by some people who lived here.
For the metal barrels, I used a lot of dirt masks and fill layers with suitable maps. I did research and found a lot of good references for old dirty metal barrels. It showed me that the top of the barrel is mostly has leaked rust. These rings around the barrel may be completely scratched and going to have metal wear.
Also, I had some problems with baking this door handle. The door's handle somehow reflected on the door. Although, it was easy to fix. I split up into parts the door itself and the handle, after that I exported every single object as a separate file to the substance painter and bake it like that. It helped and the door handle did not appear on the door.

Along with that, I made the barrels more rounded and not that chunky. Due to the fact I have very low poly barrels, It was hard to make high poly with rounded shape and smooth all the borders. I redid them and they look a bit better, in my opinion.
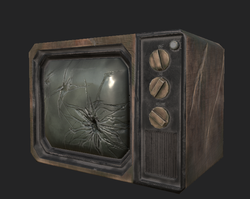
Then I remembered that I still have unfinished tv and I decided to finally make a texture for it.
 |  |  |
|---|---|---|
 |
The next thing I did was tires, the rope, concrete barriers and the lantern. I have already done patterns for tires previously in the high poly model, so it eased the process of texturing it.


The next thing I did was tires, the rope, concrete barriers and the lantern. I have already done patterns for tires previously in the high poly model, so it eased the process of texturing it.
Then I did textures for the sofa:
 |  |  |
|---|

Another batch: trashbag and water pipes:

In order to get the right impression of the plastic material, I experimented with metallic and roughness parameters.
Then I published my wood texture into a substance painter as sbar. and enhanced material with some dirt/grunge maps and generators. I also used a position generator, so it's darker in the button. There was a problem applying the wood material for the tree trunk as you could see seams and unwraps wouldn't match together. My solution was to turn on tri-planar mode on every texture layer.

I have made the fence with alpha-blending. I used the normal map to create a black and white mask for opacity. Just place normal texture into photoshop and fill the background and the fence with b&w colours. Then you turn on alpha blending mode and add an opacity channel in the baking panel. After that just simply create a fill layer, turn on the opacity and drag your opacity mask here.

The last props that I've done were these signs. I simply searched for photos of different signs/nameplates and altered them by drawing on top. I used leak brushes, graffiti spray brushes that I downloaded here. I used them a lot as I wanted to have some signs marked with paint spray. Also, I used the simple airbrush and the blur tool when I needed to get the same result.

Foliage&Plants
We have been taught how to make foliage and it inspired me to add some greens into my project. I have been thinking about what kind of plants I can have in the street backyard. It is definitely weeds, grass. I thought I can make dandelion plants, however, due to the lack of time I considered modelling only leaves of that plant without the flower itself. In my opinion, this plant without flower looks more appropriate for my atmosphere, as long as I want to make an abandoned and soulless feeling.

fffff
During my research, I found very good referenced for dandelion plants. I found out that they grow towards the sun. To facilitate the process of picking up the shape I easily exported one of my reference images into 3ds max and drew with the Cut tool on top. After that, I applied a few modifiers, such as Bend, Twist, Shell and TurboSmooth and copied 6 times.


In the process, I came up with different variations of modifiers, however, I reduced the samples number to 4.
Modelled low poly planes for the leaves.
I was willing to create wet and dirt dandelion leaves. For little wrinkles and convexes, I used the height painting option.

Then I switched to the grass. I created simple shapes and baked them in substance painter on a single plane. I was faced with some issues here. The grass was overlapped in some places and looked different from what I expected. What helped me is placing me, high poly models of grass sprouts much closer to the plane and decreased strength in the twist modifier.


Before
When I exported the grass assemble into unreal, I realized that planes are too visible. Along with that, the colour was too bright and the grass was too high overall. Therefore, I came back to Substance painter and adjusted colours. For the height, I basically squeezed it in 3ds max in all axes and added extra filler planes.
/In addition, I want to share with you a very good website with a huge library of props and it could be useful while you looking for references and want to see already created 3d models or materials rather than searching for real objects.
Lastly, I would totally like to create more foliage in future and experiment with planes assembly. I find it very exciting creating nature in 3d environment.

After
Tiling material creation. Substance designer
I also have been tried to create my own trim sheet. It was interesting to do, however, I was repeating each step of the tutorial I've chosen and not much analysing how to use those nodes. I still learn something. After I started trying to adjust this material I started to comprehend what those nodes do. I believe that when you try to alter the material on your own, there is where the learning begins.


I created this plaster material combined with several grunge maps and noises. After that, I pick up the colour with a colour picker from references that I found. I found it much more useful than just creating the whole gradient from scratch. I still had to fix the values and make them as I like. so I did a few variants of the gradient ma as well.
On the right corner, you can see the basic shape that I used for the arch strip.
Mask for heigh blend
Along with that, I found a very exciting timelapse for windows. My initial thought was to just have this window where is 16 window panels, however, I reconsidered my idea and decided to use only 1/4 of the whole UV map for each window I have in the scene. It creates decreases the repetitiveness of your meshes.

I have done muddy dirt material as I wanted to blend it with my cobblestone material on the ground. Although, I did not totally like it because it was a bit too dull and boring. Here is the result.


So I decided to create another dirt material as I found good tutorial series of Adobe substance 3d and I watched them all. It was very useful as you are going through all substance designer features and basics. It helped me to understand the consistent workflow in Substance designer.

Here you can see different details like different shapes and sizes of pebbles and twigs. It is easily done with Shape splatter and shape splatter blend. You can see the connections in this picture:

Also, rather than using a water level node as a base, I used it only for creating dirt on top, so it blends nicely with the whole material.
I also was informed in those series how to make a subgraph and how to use it, so you basically can facilitate the process by adding your already existing node, for example, a shape that you like. In addition, you can set different parameters for the node that you created, you can create your own ones. That is perfect for such a workflow because you don't have to create the same shape again from scratch.


I have learned how to use crop grayscale nodes and it is very useful when you avoid repetitiveness. Firstly you create multiply shapes and then you can crop out the one you want to use it gives you the ability to change other settings like colour/roughness/size for each of the shapes individually.


In these screenshots, you can see the difference between just solid cobblestone material and two different dirt materials blended with it. The Vertex blending mode gives you an opportunity to modify your material add variety. You can use it on top of any existing material, even on small objects, however, it will take you performance, so it is better to use it on huge objects like buildings/ ground/walls etc.
Along with that, I made cobblestone material for the ground. I'm going to blend it with dirt material in Unreal. I firstly created just concrete ground, although I did not like it either because it did not have any complexity and I wanted to create a pretty realistic scene. To do that I decided to go with something more unique and I found a tutorial on exactly what I needed. I like this material more because it contains a lot of details like the dirt material( pebbles, rocks, plants, moss. Speaking of the moss, I did moss by watching another video with explanations. I just simply took the moss creation process from the video and recreated it in my graph, so it appears only in-between cobblestone.

In the beginning, I was just copying the whole workflow from the video, however, it changed when I decided to add the moss shape. I could not comprehend how to adjust my graph and add mode details, therefore I went through all over the graph and tried to understand and name almost every node that was created. I was pretty delighted with the result so I decided to leave it.
Here you can see how I created a shape for the moss. It is just a sphere that transformed into one thin sprout and rotated around its axis. Then placed only in between the cobblestone tile, using the grid mask that I already created previously. I also warped the grid so the foliage does not show up very straight and like in a row.


I made brick wall material with a very clear tutorial as well. I was not that confident and still not enough to create a huge graph on my own, that is why I decided to first see options, that I already have, and try to recreate them with a pinch of uniqueness. I always try to play with settings and do not copy completely all tweaks and parameters changes that were in the video. I want to learn how to create materials in the particular software, therefore I need to get the idea of what exactly this node does, where it connects to.

Here is the graph. You can see how I started with the brick pattern and after that added details (brick deterioration, brushing, air pockets, cracks, grout in between) as always and roughness information (different grunge maps).

The last thing I made for tilling textures was moss material. I was planning to do it for a while as long as I was intended to utilize it as a blending material on top of the brick fence or the building I have.

I easily combined several grunge maps and noises to create a moss determination. Then I created a gradient map by picking up colours from moss references I found.

For moss shape, I used the same nodes that I used in the cobblestone graph. I created a subgraph for this shape and placed it on the moss graph.
Today my task is to sculpt some models. Firstly, I decided to sculpt something easy. It was a trash bag. Even though at first it seems like it is a common object that would be easy to picture but it is not the whole picture. Because of the folds that have to look realistically, It took me more than 1 hour to sculpt it. What helped me was this tutorial that showed me how to make those folds. Basically, either using brush presets for folds or creating them manually with DamnStandart or any other brush that makes cavities. I also used this custom brush by C. Gergov for some part of the mesh, which I found on Artstation marketplace.
Here is the result of the trash bag

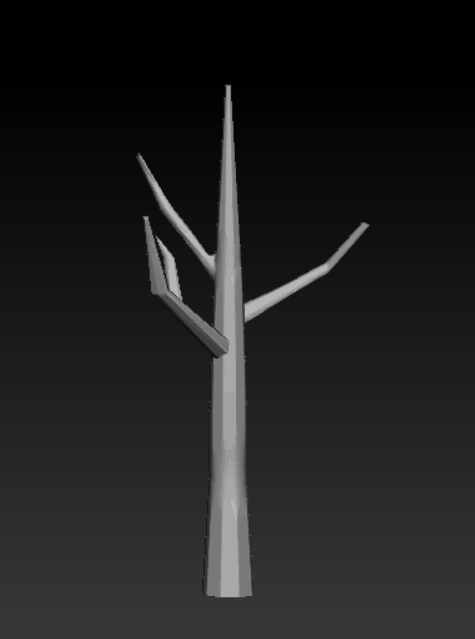
I did sculpt of a rotten tree trunk after. At first, I was doing a tree without an idea of the exact type of tree it is. So I found some references and started sculpting the base. I've been masking everything out and leaving just the parts I need. Then I was pulling out them in order to create more branches. To make the silhouette more interesting I also changed the position of each of the branches with gizmo and move the topology brush. Overall I used ClayBuildup to build shape and OrbFlatten to flatten edges. I am going to do a retopology of these two objects after.
Sculpting


//In between, I was doing unwrap and I found a nice feature to speed up the process. I used the FlattenCustom button for identical unwraps. After polygons are separated I press stick average, so I have a nice stip with unwraps here that originally were bent and bumpy.
Before sculpting the sofa I painted different parts to different colours in the VertexPaint modifier.

So I started sculpting a sofa. I was intended to transform just an ordinary sofa into a survivor' sofa so it definitely has to look shabby and rumpled. Firstly, I subdivided my whole mesh several times so it's more comfortable to sculpt. I crease all edges and that made a good bevel effect and smoothed the silhouette. Then I started adding details like scratches, holes. I made convex around the edges for pillows with Inflate brush so that it gives the impression that it's stuffed with something. I also tried to create folds looking into references of different sofas.

I appended some long stitches as new subtools but I'm going to merge them in the end as I want to have them only as a texture.
Before sculpting high-poly for the tv, I also painted the model with VertexPaint for a more comfortable workflow. Then I was sculpting, adding custom cracks and adjusting them, creasing edges and making the model more unique.
In addition, I used this alpha pack by Rafał Urbański. It was very helpful in creating nice cracks in the tv.


 |  |  |
|---|---|---|
 |
After baking the whole mesh I saw that it didn't recognize buttons. I easily fixed it because turns out I didn't match the names. It is a good reminder about having the checklist when preparing for baking your meshes.
Firstly I had a very dense high-poly model because I was redoing mesh with Dynamesh by tweaking resolution and pressing the button a few times and in the end, it became that dense.
It is very easy to exaggerate and otherwise while sculpting. It is important to feel balanced when sculpting something realistic.
I decided to sculpt one horizontal and vertical plank for the fence and copy them around. I firstly build a mass by filling areas with ClayBuildup and then drew some lines as wood has with Orb_Slash_Curve


//I found nice brushes alpha pack that create damage and cracks.
Another day I considered sculpting another batch of my objects.


//I found a nice alpha pack that create damage and cracks. I used it for all types of damages.
I also redid the trashbag as when I tried to apply textures it doesn't look that baggy and messy as something inside and it is made of plastic. After that, I put my waterpipes in Zbrush and subdivided a few times and smoothed borders so it is clean and does not have any hard edges.


Finally, I am finishing sculpting high-poly models. I already created a high-poly tire in 3ds max and I only need to subdivide it and smooth it a bit.
For the concrete barriers, I used the same damage alphas that I downloaded recently and adjusted them how want. In addition, I creased all the edges and went through them with TrimAdaptive.


I didn't do much for the lantern, although I added some extra geometry, so after baking it's gonna have an illusion of details. I was basically masking stripes and inflating them with Inflate modifier in the Deformation panel.
Materials. Getting to know substance designer
Today I was doing some materials for my project. I decided to have tilling materials partially. I found a good tutorial that precisely explains the actions and what do those nodes create. I used this tutorial for wood material.

Here are the nodes.

And here is how it potentially going to look on a tree trunk.

I created trim material with this tutorial as well by Nvidia Studio.
I created window material with this tutorial
I created cobblestone material with this video
As I watched a few tutorials I learnt something useful as well. For example, how to create something more exciting like a plant shape from the basic sphere. Now as I had the opportunity to get to know different nodes and their options, I can easily utilize this knowledge for future projects.
Week 6 - Backyard slice project. Modelling
As always starting with block out. After several iterations, I made my decision about what I am going to make. At first, I was thinking to make an ordinary cute backyard with stylized assets but then I changed my mind and got some ideas of abandoned places. I remembered the famous picture of the amusement park in Chernobyl. Therefore, I thought it will be cool to create a lifeless playground for children. I made my decision that I want to create a survivor's backyard, which is outside of a multi-storey building somewhere in East Europe. Also, It has to create an atmosphere of an abandoned, overgrown and post-apocalyptic world. I will create one side of the building where the survivors live as well.
I made a few variants of my backyard. Here is two of them:

After couple of iterations I stopped at this variant. It is thefinal block out:

After I set the overall idea I started modelling and meanwhile searching for references photos. I have begun with props and assets.I still did not finish modelling all objects but here is the result for now.


In order to model some of the assets I used:
-
this tutorial for tv modelling. Although, I did not do exactly how it's made in the video because I need a game-ready asset and remain low polycount as I still going to sculpt a bit high poly in Zbrush.
-
this tutorial for the sofa just to see the workflow. At first, I did all the same as in the video and after I just reduced polycount by selecting edges via Dot ring and pressing ctrl +backspace (to avoid floating vertexes).
-
this tutorial for the tires as I wanted to create a basic tire pattern, but at the same time, I wanted to preserve the low poly mesh. That is why I considered leaving this mesh for the high poly baking.

Week 6 - Presentation and lighting setup
For this stage of the project, I had to establish a nice composition and lighting. I've been recommended to check one tutorial ot about basic quick render. I used also my gained knowledge from the previous study year about 3-point lighting.
What I did is I exported my mesh within textures to unreal engine. Then I connected channel packing to materials. Also, I unticked sRGB box for roughness/metallic/normal/specular as it makes the material shiny. In addition, I renamed all my textures with a T_ preffix and added a suffix to each of single texture ( e.g D_ for albedo, R_ for roughness ).
During the lighting setup, I placed 3 directional lights with different intensities. One of the lights(1,5 lux, solid white colour) I placed on the left side and a bit higher than my pumpkin. Another light (0,75 lux, warmer light colour) is on the right. And the third light( 15 lux, warm colour) goes at the back more from the left side. I also set all my lights to be movable.
Here is the lighting setup overall.

I created a floor material in order to have a nice background colour. I only changed the shading model parameter to Unlit.

After that, I set a gradient by adding Exponential Heigh Fog and picking the colour from the floor.

I also added Post process volume to the scene and tweaked some parameters. In the lens section, I turned on exposure min and max brightness and set them at 0.5.
After some hours of playing around with lighting settings, I got the result. I changed the first direct. light's colour to green and added another dir. light from the right top. So the light setup has changed a bit. I made bigger contrast between the pumpkin and the background by adjusting a vignette slider in PostProcessVolume settings. For variation, I placed a point light inside the pumpkin's head to have a glow from inside and take some spooky screenshots with almost complete darkness.
Here are the final beauty shots.


I also experimented with the light. I did several screenshots with orange background and resemble the pumpkin's colour. I did it in purpose cause it's nicely matching, however, It does not increase the focal point here as if I had dark background.
Week 5 - Texturing
Firstly, I used vertex paint. That helped me to organize my mesh by separate parts and hide them when it's needed.

Then I started with basics, base colour and some rough textures. For most of the process, I was adding fill layers +black masks and some generators like Dirt, Mask Editor, Mask Builder.

I mostly used texture maps called Grunge because it has nice roughness information. Also, I tried to produce a good pumpkin texture looking to references.


I utilized the dirt generator as a texture and height generator. I set the height and colour for this layer and played with dirt generator parameters. Also, I left it with 29% of opacity in order to not overwhelm the material overall.
I was referencing on tutorial by RobotArmy on youtube and videos from a previous study year. The tutorial helped me to get to the right direction in texturing.
Those generators underline your edges and make them more visible. For example, I added a fill layer + black mask and Mask editor generator. Then I went through all parameters, changed only curvature and ambient occlusion, and turned on Cavities mode in Curvature section. That created nice features to the cavities, scratches and different little hollows.

There is a simple breakdown of how I made these cavities for the edges. I added a fill layer with a darker tone than the base colour, then mask editor with little tweaks in the curvature section. After I wanted to blur my result, so I added a blur filter and sharpen filter as well because the blur filter does too much and I needed to remain some sharpness.

With blur
Then I added another blur because the cavities were still too sharp.
In addition, I added a lot of fill layers with grunge textures. Some with height information and some just with the colour. It makes my model more interesting. For instance, I added a grunge concrete dirty map and it made a nice texture to the lid.

With grunge map
I had some problems with the texture of the lid and the stitches. Unfortunately, It turned out my baking was not perfect. In the texture sheet, those problems were shown as some dark spots from ambient occlusion map. However, I did not need to fix it necessarily because it was covered by other objects on top. For example, this pumpkin's lid has a black spot in the middle but due to that the lid is placed right on top of the lid, you can not see it significantly.


I assume that problem happened because my objects were overlapping each other and the stem was a little bit inside of the lid. I had also Ambient occlusion baking parameters - Self-occlusion set to Always. This can be the reason for this problem.
I also decided to have light scratches outside my eyes and mouth. I drew it manually on the paint layer by using regular brushes (Bark, soft round brush).

(Update) I tried to bake AO one more time but with Self-occlusion on Only the same names and it helped. I got rid of the black faces, although I did not get any shadows between objects.
I used paint layers for erasing errors in baking or fixing something that generator made. Also if I needed more sharpness or darkness I used sharpen&blur filters and levels for values.
In the end, I added a position generator on each of the parts of the pumpkin. Position generator basically creates a shadow that and nice gradient if needed. You can change them by tweaking global balance and global contrast parameters. I also changed global invert on true as I wanted to have shadows underneath the objects. I used my baked id map information to make every part of the mesh have its own shadow from the position generator.

With position
Without position
There is not much difference but it still creates a nice effect of depth to the mesh.
Week 4 - Baking and problems
The most nasty and problematic part for me. After setting up low-poly and high-poly I had to prepare for the baking process. I did all preparatory steps for it like, for example, set everything to 0 coordinates, changed names to SM_name_high/low, unwraped properly, set everything to 1 smoothing group. Besides I've done everything to have my baking correct, I got problems that I needed to fix as soon as possible.
I imported my low poly into substance painter and there is where problems started begin. I had a strange line on the pumpkin's body that apparently appeared by some hidden vertexes in the mesh. It was easy to fix. However, there were also some parts that had some artifacts. I fixed it by regulating and playing around with Max frontal distance and Max rear distance in baking parameters. It helped but I saw another issue with baking. Turn out the stitches are not matching with high poly model so the ambient occlusion appeared like a gray shadows but on top of the mesh not under it.

So I realize I had to redo the stitches in zbrush. I opened my pumpkin tool in zbrush with the old stitches mesh and I simply clicked zrmesher and It changed the topology. I liked the result so I exported the file with this change into my max project. The old stitches were replaced be new ones and I started retopology again. Along with that I had to unwrap them again too. I did it and placed them to the second texture sheet which is 1024x1024, where are the lid, the stem and the stitches itself.

I tried to bake my mesh again and here is the result:

I change again settings and it helped a bit, although there were still gray outlines of the stem.
After a long time of searching and asking the problem solution, I came to the realization to check my mesh position by importing them together in max. So, I tried It on my computer and the mesh showed up with just grey colour. It was probably a problem with my computer performance. I couldn't import my high-poly to 3ds max. I tried it on another computer and it rendered perfectly. Despite that, I finally was able to see that my high-poly mesh is a little bit misplaced. I placed them just eyeballing and changing coordinates. Now I can start texturing.
Week 3 - Unwrap
The last interesting step but not the least important. Today I was making seams, creating unwraps and placing them on the most fittable place. Since we have two texture sheets (1x 2048 texture set, 1x 1024 texture set) in a brief, I decided that my main part of the pumpkin will have the most resolution. So I placed the pumpkin's head and the body unwraps on one texture sheet which is 2048x2048 and for the remaining part ( stem, lid, stitches) I decided to place it on another sheet (1024x1024x). . I could just use one 2048 sheet or one 1024x but my intentions were to not be a greedy one in sense of textures as long as I wanted to have a nice baking result and good quality textures.

Each of the assets was easy to unwrap, however, it took time and patience to complete it. It took more time to unwrap the stitches due to the fact that they had messy geometry that I did not see at first. I had to fix them, so it looks good in low poly and does not only fit the high poly version. I do not know if I wasted my time or I did it correctly, but I also unwrapped the stitches by side, like a square (front, back, left, right). It helped me to prevent a big distortion and also, in the process, I saw some floating vertexes that I fixed after.

In addition, I tried to place them as close to each other as I can to reduce wasteful space on my texture sheets. It was impossible to make any of unwraps straight as long as my mesh did not have straight edges, although, I was adjusting the unwraps by relax: custom and peel mode.
I was thinking over how to unwrap the pumpkin's head without creating a lot of seams since the model has many bending moments and I came up with the idea that I can draw seams where are cavities, so it divided head on pretty similar unwraps. For the top and the bottom of the pumpkin, I was relying on circle shape unwraps, and it worked good. To sum up, I'm pretty delighted about my unwrap but let's see how it works with baking.
Week 2 - Decimation&Retopology
Today I have decimation and retopology on my task list. Since I finished my sculpt I had to start preparing for the baking process. I started doing decimation in Zbrush. I was playing around for a while until I saw a good result along with not too big polycount. I was not sure if 3ds max will import the whole pumpkin as long as I know that it can't handle big files. I mostly set the decimation quality to 1% and for some other parts of the pumpkin, I set it even lower like 0,2. The head has to mush polys so I got to decrease it by setting up decimation to 0,3%.

You can see in the first screenshot that at first, my mesh looked very dense. This was made deliberately in order to make a wholesome silhouette of the model. I was not greedy with polygons and decided that I am going to reduce the number of polygons at the end.

I inserted some geometry into the mesh as long as I wanted to keep my cracks and scratches a part of the mesh and the silhouette. However, iT was a mistake, I just got some extra unnecessary polygons that won't help me in creating the silhouette. It turns out it does not matter if you add some geometry to your model because you will still have them on your model after baking. That I was told by the teacher and that what changed my workflow. I realized that I should not pay attention to small areas like cracks, dents etc.
Also, I found a very useful way to simplify the top process. You can just select a loop of edges and pull them down, which will create another row of polygons next to yours. I did the whole body for the pumpkin with this method and only changed the position of the vertexes with Conform brush from the Freeform panel.

 |  |  |
|---|---|---|
 |  |
Tris&polycount on each pumpkin part
I tried to reduce polycount by connecting vertexes with TargetWeld and even deleting vertexes' positions and creating them again. I've found some examples of polygons placement, position and implemented some into my mesh.


Here I combined two polygons assemble methods. This assemble makes a nice round shape of your mesh, although it's not helpful in decreasing polygon count.


There is a complete retopology.

What I have already learnt from Zbrush is that you can always create almost everything from a sphere, even a cube. I've done the base by creating a sphere, masking parts to not touch them while deformation and moving some sliders. After that, I made a lid with a sphere and the stem with a cylinder. Then I started the sculpting process. For creating sort of a texture I used Orbflatten_edge (1), ClayBuildup (3) with a square shape alpha, Move+Move topology(4,5), Inflate(6), Orb_Cracks(1) brushes. I found out that I can use a claybuildup brush (3) to build some mass and then trim it with an orb_flatten brush (1). There is another brush called TrimAdaptive (2) that also cuts edges and you can make a great sharp edge, however, it is better to use it with a hard surface rather than something organic.
In the middle of the process, I've realized that I've been sculpting my pumpkin for 2 hours straight and I did not even get tired of it. I truly enjoy sculpting so far.


1
2
3
4
5
6
6
7


I was sculpting this pumpkin and tried to make it more unique, with cracks, scratches, wounds, scars and other imperfections. I've seen some cute references for pumpkins and found some cute ones that had bodies. That is why I decided to give him a body too. At first, it was wonky and did not have a solid shape. The hands were weird and had an uneven shape. Next step, I fixed the hands by making them more rounded and more accurate shape overall. Then I did the same with the legs. I always was thinking about how this thing would look like if it was a toy. After some changes, I started creating some patterns and wanted to make an impression that it's a real wood material.


I also created a word hint on the back of the pumpkin. I used the same method as for other cracks by creating them with an Orb_crack brush, only pressing a stylus harder to create a contrast between ordinary cracks and the word. The pumpkin's face overall reminded me about one game called Spooky's Jump Scare Mansion. There was a main character named Spooky and her face was surprisingly cute as it is a scary game. So I wanted to implement the same spooky feeling along with a cute face to my pumpkin.


I made a high-poly stem with Orb_crack brush, just drawing lines and imagining the texture.


