Presentation & scene setup
All assets and textures are done that is why we can set our scene. I had to work more on the lighting setup inside the room because there are no windows in my room from which direct light could come. Talking about lighting, I tried to illuminate every asset but do not increase the number of light sources which there are already plenty. I tried to use both cold and warm lighting, so it is more realistic. Also, one of my group members has made a mice candle blueprint which includes the candle itself and the flame. It allows me to place more point lights on top of these candles which would look realistically.


How to create 3d environment assets faster
In this post, I would like to Investigate techniques and tools that can be utilised to create 3D environment assets faster and look for ways in which assets and textures can be given variety to hide obvious repetition. Beforehand, you could create a whole library of simple objects that would potentially be used all over your environment. For example, trees, bushes, windows etc. Although, if your project includes unique assets or you do not have much time it will not be a great option.
First and foremost, while thinking about avoiding repetition and at the same time keeping everything consistent and quick, I get the idea of an already known option for me - trim sheets. It is a pretty impressive way to create a texture sheet for any size object. Especially, when you intend to create a huge object. Without a doubt, it would be a better idea to use trim sheets as it will definitely take less time rather than creating each texture for each element of the mesh separately.


The second thing I found out was blueprints. This year we were taught to use blueprints to avoid repetition. You can create a blueprint system that will change the colour/size/position of the objects you chose. This will reduce your time in creating different objects as your engine will do it for you.
The third feature that could facilitate your creation process is decals. When you are using lots of the same objects in one scene you better consider creating some mesh decals. It will create an illusion of the difference between those same objects and add more plausibility to it. For example, you could create damage decal and place it on the wall or some furniture if it is an interior.
To sum up, there are quite a few ways to create your environment assets faster and easier. You can build up the whole library of simple objects which could be utilized as insert meshes or your base. You can make a trim sheet in order to create textures faster. And lastly, you can use blueprints and decals in order to diversify your assets' looks. This will reduce time for making different assets and hide obvious repetition.

Textures
I have been doing textures for a while. I have not faced any difficulties while doing textures except baking issues. It would seem that I am already an experienced person in that, although I still see errors in this area. For this operation table, I had an issue with the edge that was split into two. I had to chamfer this edge around so when it is baking time the program recognizes where to make the separation. Initially, it has baked the carcass with a grey square which would be difficult to fix manually. In addition, I had some unwanted artefact which I fixed by exporting the normal and AO maps into Photoshop and using the Spot healing brush tool.

I was very interested in making this mesh as good-looking as I can. Also, I wanted to include a story behind this table, that is why I made these scratches on the pillows (on the high poly). It could associate with the monster who did it.
Then I've made this fireplace. I've decided to completely rely on my high poly model and substance painter features. I used concrete smart material as a base and then started throwing different textures and generators. All that helped me to create a pretty realistic look of cobblestone and wood. The same action I did for the metal fence and the cobblestone ground. Besides, I used lighting and position generators in order to create a depth of field effect and emphasize the distance between the objects.


I used these two references as my inspiration. I felt that they are matching the medieval atmosphere.

My next row of props was candleholders and chandelier


As my office is located in the mansion, I wanted to emphasize the wealth of this house and the characters that live there. Although, it is not pure gold. It is brass covered with dirt and dust which also says about the legacy of this house.
Next was some furniture for the office part:

I have decided to not have the same wood material for all of my wood objects as those are a lot. That is why I tried as much as I can to make them different from each other and have their own distinctive feature. However, I stuck to one colour tone for the group of objects that are going to stand in one area.
To make this file cabinet more understandable for its time I created some nameplates with different names of patients.

Due to a large number of wooden objects, I have decided to create a wood material in substance designer that varies with different wood patterns. I used Zbrush in order to create a heigh+normal base and then adjusted it by adding more noise/grunge maps. In the future, I want to change create a smart material that will allow me to change the tint of the base colour which will diversify objects as well.

For the walls in my room, I've decided to create a trim sheet in substance designer. Creating this material was easier than in my previous project. This material contains wood and plaster which I have already created for my previous project. Therefore it was the best decision to copy some nodes to this graph and use it as a starting base.

I still have some objects that need to be textured. Next what I was texturing was a bunch of barrels, surgical instruments and others:


Next were potions and different bottles. Firsly, I though of using an opacity map, although after importing it into Unreal I have noticed that translucency seems too visible which wasn't intended. My bottles have more roughness/metalic than translucency on the material, therefore I have decided to not use the opacity map. In my opinion, everything looks fine and even in the engine it still creates an illusion of filled glass bottles with lots of dirt.

Books, cabinet, clock:


In addition, for plausibility enhancement, I made a few damage decals and placed in on the walls.


Group project. Sculpting High polys
I made a few sculpts. Most of the time I was using alphas in order to create some convex details that I will bake down. For example I used rectangular alpha for the illusion of drawers.


A file cabinet:

This is a quick breakdown of how I have made this candle holder

I found some impressive medieval patterns, which I used for this chair. Firstly I edited it in photoshop as it is very hard to find clear png format patterns. Then I exported them as alphas and attempted to create a unique pattern on both sides of the chair.
I've made the sculpt of the operational table. For the patterns, I used alphas that I found on the internet and changed the way I like them. Also, for the belts, I utilized the Live boolean option. In order to create little clasps, I used boolean as well. I created a thin cube and another one even smaller which I placed inside the biggest one. By that, I pressed Substact mode on the current subtool and this made the whole process. It is actually a pretty useful function that was hidden from me for a long time. Those buttons next to your subtool icon actually do something!


Here are few alphas I used and will be using for next props for this prop :


Fireplace:
I've made this fireplace by simply creating a row with cobblestones and adding some texture to it. I used OrbFlatten and TrimDynamic for beveling the edges and creating nice damage. After that I duplicated it several times and made som of them pushing forward more. Also, used some existed brushes that would imititate the rock surface.

For the wooden shelf, I've downloaded some random bark photos and chose the one that fit the best. I drag it out on the shelf and it created a nice wood effect. The cobblestone was pretty easy to make as well as I made a few different rocks and made it insert subtools which I could drag out wherever I want.
Some furniture assets that I've done. My purpose was to adjust basic furniture and make it more medieval-like. I creates some alphas which I appended here


Other stuff that I sculpted:


Investigate your chosen focus. What are some common employability requirements within this specialism of 3D?
Choosing your path and the area you will give your most focus is very important for developing a solid base and getting a job in the industry. For now, I am indecisive rather I should continue making an environment or experiment and try creating characters. I feel that it is quite a transparent question because everybody would tell me to go ahead and experiment.
This year I was mostly concentrating on polishing my environment creation skills and less on character creation, even though I had two projects on characters. I hope I have time after project submission and I will be doing more things that I was postponing this year because of the current projects.
Talking about common requirements for a job in 3d it can be very obvious. You need to have technical skills and have a decent experience with the software. However, I have noticed that different employees have different criteria for that one. Some of them will require to have a knowledge of Maya some of them in 3ds Max, some will want to see the ability to work in the engine. Sometimes a company require every mentioned above skill. It depends on what is your role in the company going to be. For example, in one of the AAA- company you can be a person who is making only hair or animals.
Here is an available job position for 3d character artist next to 3d generalist vacancy on KeelWorks:


To sum up, you need to be a keen person with good communication skills in order to work in a team. Also, you need to provide a list of technical skills that require your chosen profession. You need to have the ability to create a 3d model relating to existing concept art with accuracy. You must know how to work with the feedback and be capable to find one or more solutions to your problem. And lastly, you need to be competent to work according to the team's workflow, which includes software and the pipeline.
How does creation of meshes made for deforming/animated assets differ from static mesh creation?
Creating static meshes for games already implies following some rules. Making a mesh for animated assets is a little bit different but it still includes preparation and is different from creating static meshes. When you are creating a character that will be playable in games you definitely need to think about special animation topology and how the character will be rigged. Obviously, static meshes do not need any animation loops because they will not have skeletons or be skinned.

Another thing you should consider is how the animation will apply to the asset. You have to look at where the bend and deformation occur.
To do that you need to weigh every part of the character and think about how it would exist in the real world. The weight controls each of the bones' influence on a segment of the mesh. It allows you to adjust the sensitivity of the deformation for more precise animation.
Mechanical items can be animated as well. They will also have an animation sequence and skeletal animation that you need to export into the engine.
To summarize, in order to make a high-quality animated asset/character you have to rig, skin, animate and double-check if everything works smoothly.
What is your 3D “comfort zone?” How do you hope to expand it over this academic year?
The previous year was very intense and novel for me. I have learnt so much that I could not imagine at the beginning. Now I can say that I am able to create an interior/exterior diorama with game-ready assets. Although, I still step into the same problems while doing the same old work. This year I want to expand my knowledge in 3d and here I want to tell you how.
First of all, I want to polish my pipeline. I believe that it is very important to have an efficient way of doing your 3d models. I still get some problems when baking which is currently the most often problem I face. I want to recognize these mistakes and have them written down, so I am not making them again.
Secondly, I want to try lots of undiscovered things in programmes that I used the least. Those are Substance designer, Unreal and maybe some software for rendering that I haven't used yet like Marvelous Toolbag. I intend to look for new features and pipelines. I strongly believe this is very important as you can find out about very useful thing you haven't heard of and which is going to be very helpful in your project creation.
In third place, I would like to focus on the technical part of game art and its insights. By that, I mean most of the jobs in the engine. I want to comprehend more about environment creation for games. Therefore, it will be useful for me to get to know different material setups, particle systems, blueprints etc.
To sum up, I know my comfort zone became bigger from the 1st year of education. Also, I know that I can expand it a lot by achieving all these things I mentioned above. There are quite a few things to explore and get to know to become better at game development. There is no ending to learning something new. You are always learning, that is why I love this game art.

Blockout and modelling
As I established my concept I started blocking out. First and foremost is created floor and walls. I decided to have a bit of variety and make small stairs between storage and the main room.


Then I decided to experiment with object locations. There you can see that I've already split this room into 3 different areas.
Also, I have modelled few reusable props such as potions, books, barrels, tables.
After some thinking, I redid the operational table and made it more medieval and fantasy-like. I am thinking to add some medieval patterns


Also, I have modelled this old chandelier. I want to sculpt three different candles and copy them around so I do not need to produce 15 instead.


Here is the small way to create a rounding object. I created one side of the candlestick with a Line. After that, I applied Lathe modifier and started removing unnecessary loops


I minimized the number of polygons as these all extra geometry can be easily baked down
Here are most of the models I have modelled. I will bake them all, that is why they are all so low-poly. Also, while modelling them I was looking at references and comparing them. It is very important that my model are looking realistically and have appropriate true scales.


Group project
First of all our group has been divided between environment and character artist. I decided to make an environment and enhance my skill in doing interior design. We chose our theme which is a crazy alchemic/scientist who has been experimenting on people and as a consequence it caused them to transmute onto bat kind of creatures. I liked this theme and straight away got an idea about the doctor's room. I searched for references and found one matching my mood.

Then I decided to take the layout of the interior and redraw something similar. Also, I thought about the props that could be made: office table, foldable/operation table, doctor's instruments kit, fireplace, a chandelier.

concept artist Darina Kai
I looked for the same concept and kept in mind the medieval theme. I've considered doing 3 different areas. In the middle, the appointment room, the operational room. On the left is an office area with an old office table swamped with millions of books and wastepaper.Lastly, for the right part of the room I wanted to make like a little laboratory room, however, I reconsider that because we already had a full room for laboratory and as it pretty similar, It would be better to do something different. Although, we also thought would be a good idea make a transition between these two rooms. I could make a secret bookcase so it hides a real 'torture' room, where will be more experiments and

On the left is an office area with an old office table swamped with millions of books and wastepaper. Lastly, for the right part of the room I wanted to make like a little laboratory room, however, I reconsider that because we already had a full room for laboratory and as it pretty similar, It would be better to do something different. Although, we also thought would be a good idea make a transition between these two rooms. I could make a secret bookcase so it hides the real 'torture' room, where will be more experiments and

For the right part of the room, initially, I wanted to make a little laboratory room, however, I reconsidered that because it will be a whole new room for that. It would be better to do something different. I got an idea about little storage with different barrels , herbs, jars, pots etc. It could be a very ordinary area however the whole mystery behind one of the walls. Also, we have been thinking that would be a good idea to make a transition moment between these two rooms - the doctor's office and the laboratory. I could make a secret bookcase so the player has to solve some puzzles. For example, he is looking for this bookcase first and then has to find a key in one of those jars to open the secret door.

What is the purpose of highly reusable textures and 3D assets in video game environment art creation?
Being efficient includes a bit of an effort but it is one of the crucial things to keep in mind while you are making a game. Sometimes you have a very repetitive area where you could reuse your assets and textures. Sometimes you have a bunch of candles or books that would be a nightmare to have with single textures and their own models. That is why people in-game industry managed to have lots of assets with different variations of size, colours etc. Building reusable modular assets and textures that can be integrated into multiple ways in the engine will essentially help with optimization.
Textures are one of the expensive parts of game development. In order to reduce the number of textures, you could create a trim sheet. For example, a trim sheet combined of different parts of the wall or with different purpose decals such as bolts, nails, stickers, graffiti, scratches. These sheets are significantly vital in an open-world game as they allow us to add details to assets that we could not afford to model in or bake into the textures.

The purpose of modular assets is obvious - to not model every single model a thousand times and then have another thousand polygons in the engine. For instance, you do a medieval environment where you have the same wood plank all over the place. Is it better to model the same shape over and over or rather create a modular kit that would include that particular plank and you just have to assembly it into another object? I think the answer is clear. In that case, you will be dealing with fewer polygons and less effort in creating a new model.

In conclusion, it is off the words, the purpose of highly reusable assets is about performance and optimization. It drastically reduces time spent on modelling and texturing. The downside of that it still takes time.
Saddled animal. Presentation
I imported my mesh to Unreal engine and I took a few screenshots of different angles so you could see the animal from each perspective. Also, I wanted to have two different lighting settings. The first one has the warmest temperature for lights and the one with purple-pink background has a cooler. I have encountered one issue that could not be fixed so far. The textures are too blurred and has fewer details than in Substance painter.


After some material changes, I took some more beauty shots. For a more attractive look, I adjusted brightness/contrast and made a vignette effect for all of the screenshots.


Problem fix
Recently I had these unsolved issues actually been solved. Thanks for the help of my tutors, I've been told that it is due to unmatching values on different maps like roughness and the base colour. What I did was paint over the places where the seams were visible with just roughness turned on 0.7. I did the same for both head and body texture sheets. It helped to level out the values and now they were less eye-catching in the engine.

Texturing
Straight away, I faced a few issues in baking. It was related to overlapping Uvs. After several attempts and million hours of baking, I finally got the result I wanted and was ready to start texturing.


I did a base colour for my animal, played with some generators and masks. It already has built a great base and the animal looked appropriate to the real animal. In my opinion, this sculpted fur does not convince that much that it is real fur. I know that it is impossible to make fur rather than sculpt it or make the hair cards but I still needed to add more persuasion and of course fluffiness.
I considered exaggerating the fur I already had as much as I can. I drew with a fur brush manually and added a fur 01 fill layer with height turned on. Also, I wanted to enhance the realistic look, therefore I added the light and position generators. They create a more diverse colour scheme and set the lighting.


Here is the final result of texturing the saddle + other hero assets :


In addition, I textured two opacity included assets - whiskers and little hanging details on the saddle.

In order to create realistic materials, I always was looking into my references. They helped to establish the materials and follow the idea.
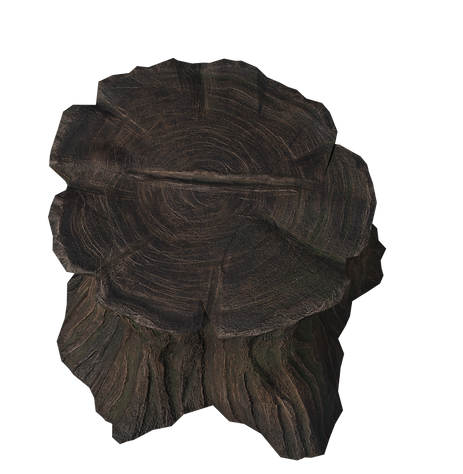
In addition, I decided to have a tree trunk in my scene as a presentation element, where the animal standing on top of it. I quickly sculpted it and did a retop.


I have appended my animal model, so I can see if it aligns properly and the animal stands on it rather than floats
The way I did the retop was pretty easy. I tried to simplify the shapes of these interactions. As long as the top part was not very detailed in terms of geometry, I considered decreasing the number of polygons and turned a few into triangles. It significantly decreased the number of polygons and left the other parts intact.
For the texture, I did pretty much the same actions as for any other assets. I also attempted to create a wet loo in some areas because I wanted to have diverse roughness/metallic maps.

Saddled Animal. Retopology.
Since I finished sculpting I can start retopology. I merged small details to whole objects, for example, inserted gems to the necklace, the belts and straps to the saddle. After that, I decimated my meshes in Zbrush and exported them separately. Now it is time to start creating the retopology.
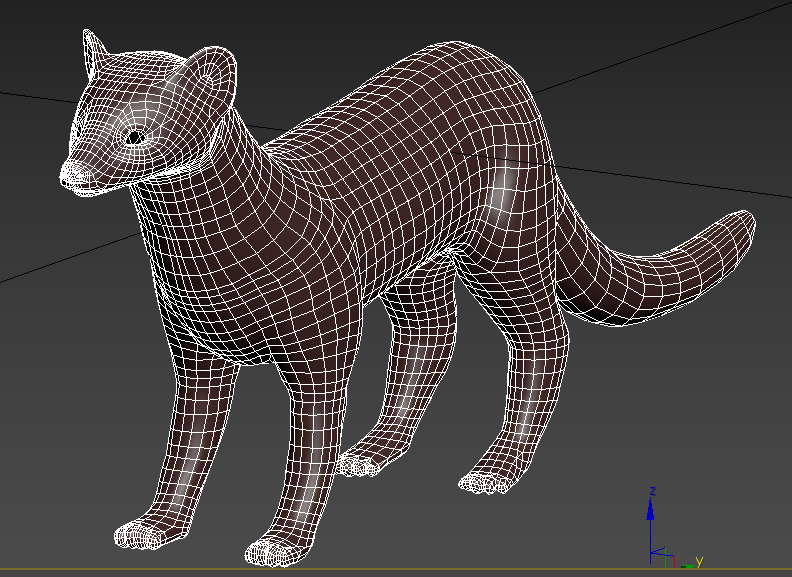
For legs, I tried two methods. I did not want to add extra loops around the whole body, so I made the transition by creating triangles. Moreover, recently I run into one useful video about topology, that taught me how to easily reduce polycount.


I started with a face as long as I wanted to make it denser than the remaining body. Relying on my previous experience I established loops around the eyes and nose.
Due to the fact that I have 23k of triangles as my budges for the body, I decided to not suppress myself and be generous in polygons. I learned a few new tips while doing retopology in Max. I used Relax Conform and Move Conform brushes for relaxing meshes and making polygons more square-like. So now the is 11k for the body.
Here is the result of the whole model and its props:


In order to have consistent mesh, I tried to do not have an exceeding geometry and keep in mind that it is still a game-ready model and every polygon is a treasure.
As a result, I can say that my retoping process become more coherent and I have learned some tips and tricks that facilitate my work.


Here are my UV sheets :
After a long work, I have added some assets and changed uvs:

Saddled Animal. Beginning

Along with the second term we receive new projects as well. This time we were obliged to create a saddled animal. I started by searching for different types of animals and I found a few I liked. It was a weasel, stoat and ferret. I got rid of these ideas after I run into a very compelling and exhilarating animal, which was a pine marten. There is a significant resemblance with the animals I mentioned before. According to my research, pine martens as weasels and stoats are related to the same animal family, which is Mustelidae. Firstly, It was hard to distinguish two types of martens, however, after I read about them and looked more I finally could differ them.
Here are reference that I found for different colouring:
Pine martens are not the only type of itself. There are few species that have distinguishing features. For example, Nilgiri marten has a very bright yellow chest and black fur. The Japanese one has a bright yellowish fur and a black nose. The one I reckon most cute was the same pine marten with chestnut fur and a black nose.
I don't know if digging deeper and discovering every single kind of animal will help me to sculpt it more realistically but I was very interested to get to know each of them. All kinds of martens mostly differ in colouring and in the location, they are settled. The mustelid species are most likely to be seen in trees, although pine marten also spend much of their time on the ground, looking for their prey, such as small birds, fruit (notably rowan berries and blueberries), insects and carrion. Pine martens even do not hesitate to be next to people. So they can go to the neighbouring village in order to find some food and steal a couple of eggs.
I have decided to make a base looking into pine marten. which was my first variant. This cat-sized animal has brown chestnut fur, large rounded ears, pale or creamy yellow throat patches, and a long bushy tail. In comparison to minks and polecats, martens have longer legs and tails. While observing martens, you can see how they are gracefully loping and bounding on the ground from place to place. As a stretch goal, I want to make an animation of the pine marten bouncing from snow.
I decided to start sculpting the animal and give it a go. Then I asked myself a question how can I sculpt and see my reference on top of my sculpting. I googled it and found out a few answers, I can use the see-through option on the right corner, I can use spotlight, which was for me a big discovery, and I can use XYZ (floor) planes for placing my images. I put an image of the left side view of pine marten and then the same for the front. Although, I haven't used it often because I needed to see the face next to what I'm sculpting.
Going further, I've been shown the Zsphere method for creating different creatures. I utilized it for the whole animal's body. Usually, you need to apply adaptive skin and it will make it out, although I could not apply it to my model as there were some problems that would be difficult to fix

Remeashing all mesh and then Zremeshing it was the most profitable variant in order to smooth everything out and have a nice subdivision level. I also added a sphere for the low chest and stomach parts.

I smoothed everything out again and started building a mass with ClayBuildup.
I made face for side, however, I still had to figure out the front.

My attempts with eyeballing proportions were unsuccessful and I decided to put my reference of front view straight into Zbrush and align every feature.
Also, I started sculpting paws. I could find only a few references for the front and back view of paws, so it was a bit difficult to get it correct.

I adjusted the face and tried to give it more curves in shapes. Also, I shrinked the neck and started adding some fur.


From this I could easily fix my face and add some more shapes for the parts that should be protruding as the nose part, the eyelids and cheeks. Also the ears should be a bit curved on the front side.

These I looked while sculpting paws and when tried to make a more convincing look.


I refined the face, narrowed the overall body and made thicker the tail. I started working on back legs and managed to merge them down with the body without losing much detail. Then I switched to small details - fur and fibre. I knew that I am going to use stylized fur for textures however I still need to have some sort of fur
in high poly mesh so it created a nice normal map. I used some basic fur alphas that you can find and drew with it on everything. I was masking parts on and off so it does not affect some parts. Also, before adding fur I stored the model into MorfTarget and then erased some parts to reduce intensity.
I adjusted the shape of the face, so the eyes are closer to the nose but still preserve a nice distance to the ears. I built the form more and tried to enhance softness and bushy look as eventually, it should look like real fur. There was a lot o attempt to fix this face due to the fact that I struggled to figure out the proportions and the anatomy. I get only few references for the anatomy, although they would not help much as I needed to see how the muscles and meat laying on the bones construction.
In order to understand the face construction, I decided to watch some videos of pine martens where you can see it from different angles and take some screenshots manually. Here are a few that I took and other references that helped me:

Then I started doing a saddle as well. I found some references that I liked and tried to evolve them into one solid idea. I decided to make a pad/blanket for horse riding usually and also added stripes as a decorative element.
At first, I did not know what else I could make for this animal, although after feeding my brain with different images I came to the conclusion to add some little pouches, straps and something that entwines the neck.
Here are the references that I collected while looking for ideas:

There have been many changes in terms of the level of details. I started enhancing the fur, embellishing the saddle and I added whickers, the claws, and a necklace with insert gems as I wanted before. The most useful thing to use while making something man-made is using alphas. I created a few alphas for the necklace and one for the saddle. In order to create such a pattern, I drew a tilted grid in Photoshop and made it only black and white.

Here more a close look at the accessories.


For insert gems I used created in PS alphas. I searched for sun and moon symbols and choose the ones I liked. I adjusted these images so it is only black and white. In addition, I painted over with soft brush to create a smoother transition. Then I picked the ClayBuildup brush with drag mode and created the pattern on a created flat-surface sphere. I removed unnecessary parts, so it is nice and clean. Although, It does not matter if some hidden parts look bad, as long as you can not see them from any angle.


I choose such symbols because, in the mythology of some tribes, martens are often portrayed as lucky spirits, brave heroes, and skilled hunters. Personally, I believe these symbols characterize natural peace and awareness. It is one of the keys to being a skilled hunter.
